Fixing Bugs in FFMPEG GIF Encoding
July 23, 2020 by

Here at GIPHY Engineering, we frequently use FFmpeg to resize and reformat GIFs. We generate around 40 different renditions for each GIF uploaded to our platform, so it’s important we do so as efficiently as we can. While FFmpeg is powerful, it was designed for processing MP4 files, and its support for the GIF format is limited. In fact, FFmpeg support for transparency was implemented by GIPHY Engineering, which you can read more about here.
From time to time, an editor will report a bug with our rendition processing. One particularly vexing bug first appeared in certain renditions of this lightning GIF.
There are a couple issues we see here:
- In the top right corner of this GIF, the frame appears to be stuck — the pixels from the first frame stay still for the duration of the GIF.
- The timing is off — the original GIF has a long pause at the end, whereas the resulting GIF has no pause at all, and doesn’t flash convincingly.
We soon noticed many of our Stickers had broken renditions — small pieces on the sides would get stuck, just like the lightning. We also noticed this when launching GIPHY Emoji, and the most important Emoji was exhibiting this bug:

Unwilling to let the world go without pixel-perfect poop, I started hunting down the bug.
Bug Hunting
The buggy renditions were traced back to an FFmpeg command that we use to re-scale GIFs while retaining the original color palette:
ffmpeg -i in.gif -filter_complex "[v:0]scale=100:-1, split [a][b]; [a] palettegen [p]; [b][p] paletteuse" out.gif
This bug only affected Stickers, which are GIFs with some transparent pixels. This indicated something was going wrong when processing transparent pixels. What was strange, however, was that non-transparent pixels were being affected.
The FFmpeg codebase is large and complex, and the filter above is fairly complicated as well. Using a nifty tool in the repo called graph2dot, I generated a plot of each step in the process:
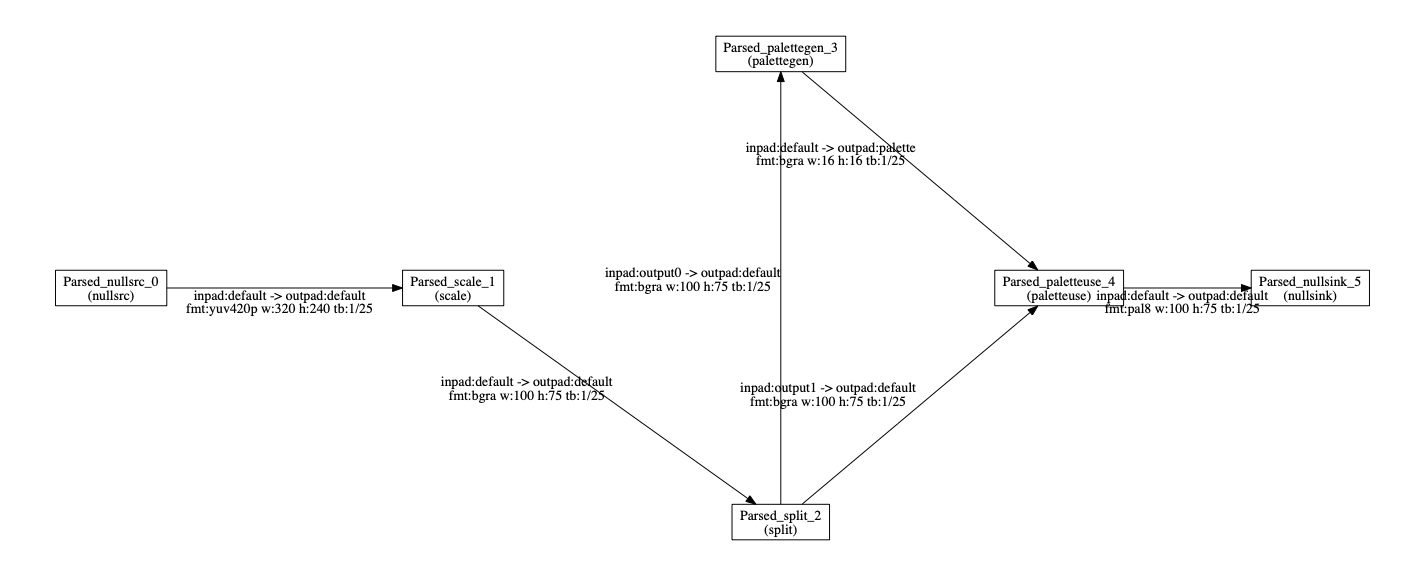
Looks complicated. I decided to narrow down where this problem was originating before diving into the code. I started by converting the image to an MP4 file, and then converting it to GIF:
ffmpeg -i in.gif -filter_complex "[v:0]scale=100:-1, split [a][b]; [a] palettegen [p]; [b][p] paletteuse" out.mp4 && ffmpeg -y -i out.mp4 out.gif

Success!… sorta. The stuck pixels were gone, but unfortunately the MP4 format does not support transparent pixels, and so every transparent pixel was set to a default color (green in this case). While this doesn’t solve our problem, it does tell us something important: this bug happens after all filtering, and occurs while converting to the final output.
While we usually think of a file format (such as GIF) as telling us how an image is encoded, a format can actually specify several different methods for compressing and encoding image data. These methods are called codecs. Since this bug seemed to be a problem with encoding (given individual pixels are broken, rather than the whole file), the GIF codec (defined in https://github.com/FFmpeg/FFmpeg/blob/master/libavcodec/gif.c) was a natural place to start searching.
This file describes a series of processing steps needed to take FFMpeg’s internal representation of video and translate it into a final GIF output. One reason FFMpeg is so powerful is that all encoders declare a struct (of type AVCodec) that defines the various steps necessary to translate an image into the desired format. This means image formats can be encoded fairly easily (without modifying too much existing FFMpeg code) and it also means, if you understand the various steps that FFMpeg takes to encode an image, you can fairly quickly read and understand an encoder.
When FFMpeg uses an encoder, there are three important steps:
- Initialization (AVCodec.init), in which the various file headers are defined, the media is checked for compatibility with the encoded file format, and memory is allocated.
- Encoding (AVCodec.encode2), a function run on each frame of the media to encode, which converts each frame into the desired codec.
- Closing (AVCodec.close), which writes any file trailers and cleans up the memory used.
The GIF AVCodec defines these functions as gif_encode_init, git_encode_frame, and gif_encode_close. This bug seems to affect the frame encoding step only — the GIFs are written out appropriately and there are no memory issues, but individual frames have dead pixels. The gif_encode_frame function performs a lot of memory management and setup for each frame, and calls one function to actually process and encode the image — gif_image_write_image.
This function defines several steps for processing images. One optimization allowed in the GIF codec is cropping – if the outer pixels of a GIF don’t change between one frame and the next, they don’t need to be included in the next frame – instead, the frame defines a rectangle containing all of the pixels that needs to be updated, leaving out the pixels that can remain the same. This saves space in the file, especially for GIFs which have large blocks of pixels that don’t ever change (such as most stickers). Due to differences in how this cropping works with transparent and non-transparent pixels, there are two functions that do this work: gif_crop_translucent, and gif_crop_opaque. Recall the bug we’re trying to solve only affects transparent GIFs, and it seems to only affect the sides of the image — two strong signs this is a transparent cropping bug. Since cropping is an optional optimization, the easiest way to verify this was the cause of the bug was to simply comment out the call to gif_crop_translucent, and re-render:

It worked! So the gif_crop_translucent function is the source of the bug. Unfortunately, because this fix turns off optimization, it’s not suitable for production systems (even a small increase in file size can make a huge difference in cost at scale).
So we need to fix the cropping function.
Root Cause
While FFMpeg has many strengths, one weakness is that the code is sparsely documented. In this case, all we have is a function signature and our best guess as to what each argument is for. Using the body, we can piece together what the function is trying to do.
Let’s take a look at the first cropping step, crop top:
// crop top
// loop from the first line of the image until the end
while (*y_start < y_end) {

    // We haven't yet seen a non-transparent pixel
    int is_trans = 1;

    // loop through each pixel on this line
    for (int i = 0; i < w; i++) {

        if (buf[w * *y_start + i] != trans) {
            // if the pixel at the buffer location isn't transparent,
            // we've found the location to crop to
            is_trans = 0;
            break;
        }
    }

    if (!is_trans) {
        // this line contains a visible pixel,
        // so we can't crop any further downwards
        break;
    }

    // since we've made it here, the entire line is transparent
    // we can safely crop this line, so let's move on to the next one
    (*y_start)++;
}

// at this point, y_start will point to the lowest line of the image we can
// crop to from the top down
See the bug? When I first read this code, I sure didn’t. Nothing in here jumps out as obviously incorrect. In fact, without knowing exactly what data is being passed to this function, I don’t think it’s really possible to debug.
At this point, my first instinct was to use gdb, the standard debugging tool for C developers. But, after poking around at the various parameters and trying to find anything obviously incorrect, I was empty handed.
The biggest problem was that I couldn’t see the actual image data — binary data is not particularly amenable to command line inspection. What if I could see the actual image as it was being modified? Writing images in C can be difficult, especially since we’re already fighting with an image processor!
However, there is a file format that is particularly amenable to the kind of quick hack we’re looking for here: PPM. Plain PPM files are textual representations of image, which look like this:
P3
# feep.ppm
4 4
15
 0  0  0    0  0  0    0  0  0   15  0 15
 0  0  0    0 15  7    0  0  0    0  0  0
 0  0  0    0  0  0    0 15  7    0  0  0
15  0 15    0  0  0    0  0  0    0  0  0
The first line is the filetype identifier, the next two numbers the image dimensions, and the next one the total color depth. After that, each three numbers represent the red, green, and blue components of a pixel. The file above defines this image:

This format is so simple, and yet it allows you to write out arbitrarily large images with only a few lines of C code. For a good idea of how powerful it is, I’d recommend reading “Deciphering the Business Card Raytracer“, which uses PPM as a final output format.
I decided to modify the cropping function quite a bit:
static void gif_crop_translstatic void gif_crop_translucent(AVCodecContext *avctx,
                                 const uint8_t *buf, const int linesize,
                                 int *width, int *height,
                                 int *x_start, int *y_start)
{
    GIFContext *s = avctx->priv_data;
    int trans = s->transparent_index;

    /* INITIALIZE PPM FILE */
    char poop_file_name[256];
    sprintf(poop_file_name, "poop_ppm_%d.ppm", avctx->frame_number);
    FILE *fp = fopen(poop_file_name, "w");

    fprintf(fp, "P3\n%d %d\n255\n", *width, *height);

    /* Write PPM data*/
    while (*y_start < y_end) {
        for (int i = 0; i < *width; i++) {
            if (buf[*width * *y_start + i] != trans) {
                fprintf(fp, "0 0 0 ");
            } else {
                fprintf(fp, "255 255 255 ");
            }
        }

        (*y_start)++;
        fprintf(fp, "\n");
    }
    fclose(fp);
}
In this case, I kept only the first while loop; it can loop over the entire image, so there’s no need to do so again. I only slightly modified the body of the loop – it prints a white pixel for every transparent pixel it sees (PPM doesn’t have transparency), and if it sees a non-transparent pixel it prints a black pixel instead. This goes on until the end of the image.
For each frame, this would generate a PPM image. I ran the command, and looked at the first frame (rendered here as a PNG):

This… does not look like poop. Although it’s frustrating to not see the right image, this is actually a good sign because it looks like the bug is still being reproduced (albeit with a different symptom), so we’re on the right track!
In fact, although it’s not immediately apparent, the generated image shows us everything we need to know to solve the problem. Readers with sharp eyes may have noticed that the image creates an optical illusion — two sets of lines, criss-crossing the image, seem to appear if you unfocus your eyes slightly and look for patterns. If you’re having trouble visualizing this, I’ve added guidelines showing where some of the lines appear:
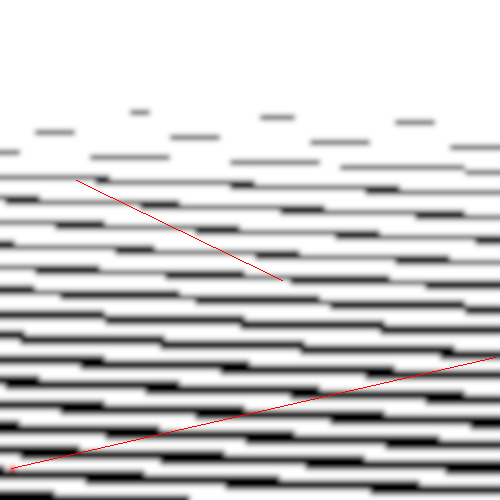
While it may seem like an irrelevant detail, this phenomenon is the key to understanding the bug. To understand why, we need to understand the most common cause of artifacts like these in computer generated imagery: aliasing.
In general, aliasing occurs as a result of converting a continuous signal (such as a sound or picture) into a discrete signal (such as an mp4 or GIF file). Specifically, it appears when a signal is “undersampled”: the computer samples the signal at such a low rate it misses vital information, and patterns (that don’t exist in the original signal) can appear. In this case, we’re not undersampling; all the data provided is faithfully reproduced in our output. However, there is an important frequency component that we control here: the width of the image. PPM files are just a continuous stream of pixels, with the width specified at the beginning determining when the image wraps around. This means by simply altering the width of the image, we can alter the frequency of line wraps, and thus the final sample frequency. In theory, this should alter the artifacts that appear on the image, and I decided to use this to gather additional information.
I started with a big jump, setting the image size to 200 x 50:

Interesting! Still not what we want, but the pattern there is now showing some significant white gaps – since the poop image has large sections of transparency on either side, I took this as a good sign. On a whim, I decided to try setting it to 170 x 50:

Woah! Obviously, this isn’t exactly what we want, but there is a clear representation of poop in there. At this point, it’s pretty clear that the width is the issue, but I was getting impatient with generating these images over and over, and so I wrote a script to iterate over a wide range of possible widths and generate an animation:

It’s there! Specifically, one frame:

This image had a width of 128 pixels – so that’s the “correct” sampling frequency. As it happens, 128 is a power of 2, and powers of 2 are important in computer science, because computers represent numbers in binary. Although the number could have been anything, the fact that it was 128 tells us that a programmer probably chose that number, meaning we can probably find that number in the code.
As it turns out, we don’t have to look far. Recall there are two different cropping functions that can be called – gif_crop_translucent and gif_crop_opaque. They work pretty similarly, but gif_crop_opaque doesn’t exhibit this bug. If we can figure out how gif_crop_opaque calculates the width, we can figure out what we’re missing.
The bug comes from the line if (buf[w * *y_start + i] != trans). This is a common method of storing and accessing two dimensional data sets in computers. Just like the PPM file we looked at earlier, the data is stored as a single, one-dimensional list, since computer memory only has one dimension. This means an image with a width W and a height H could be stored in memory as a list of pixels with length W * H. Then, to access a pixel at location (x, y), the address in the list would be calculated as
x + y * W
The y * W calculates an offset into the list so that the line is correct, and x is added to it to get the correct pixel in that line. So in this case, the image is laid out in the array buf, and we’re accessing the pixel at (i, *y_start).
Not really! Whoever wrote the gif_crop_translucent function assumed, quite logically, that buf, the two dimensional array we’re using, had the same width and height as the image itself, and used that width in the calculation: const int w = avctx->width;. However, gif_crop_opaque calculates this differently:
buf[y*linesize + *x_start]
The variable linesize ultimately comes from a struct called AVFrame, and a quick look at the documentation tells us the problem:
     * @note The linesize may be larger than the size of usable data -- there
     * may be extra padding present for performance reasons.
So the buffer has been passed to us with padding. Since the image width is different from the width of the buffer, we’ve been looking in the wrong place for pixels! This makes the fix rather simple – replace all uses of w with linesize.
The result:

Success! And 509 bytes smaller than the uncropped version, so we know the cropping has worked. As a final test, let’s run the lightning GIF through again:

Uh oh — the cropping bug has disappeared, but the timing is still off. As it turns out, this was a different bug, related to how GIFs define the timestamp of each frame – we may consider how this bug was solved in a future post.
— Jacob Graff, Software Engineer, Content Engineering