Real-Time iOS Camera Video Matting via CoreML
May 5, 2022 by
Intro
Even though I’m not a professional iOS developer, I was always excited about all those countless ways that mobile devices change our lives, and provide comfort and access to essential services. As a Machine Learning engineer, one direction that I paid special attention to recently is on-device ML and CoreML framework in particular.
I don’t want to waste your time by providing an extensive overview of its features — there’re a ton of articles and videos that serve this goal perfectly. My goal is to provide an overview of my first hands-on experience with a modern iOS stack and integration of the CoreML model which, in my opinion, looks much closer to real-world applications than some hackneyed Imagenet tutorial.
To be more concrete, in this article, I will share the implementation details of an iOS SwiftUI app with CoreML features. The app captures a front camera stream, applies a state-of-the-art Video Matting model, and outputs a corresponding video sequence without a background (a.k.a. green screen) in real-time.
I hope that the concepts, features, and codebase of this app will be useful for engineers who, like me, have just started their journey with CoreML and are looking for references that can be used as a basis for their mobile projects. The final code for the project is available in my Github repo.

Main part
RVM (Robust Video Matting) model
Let’s take a look at the Robust Video Matting project and how it will be used in our app.
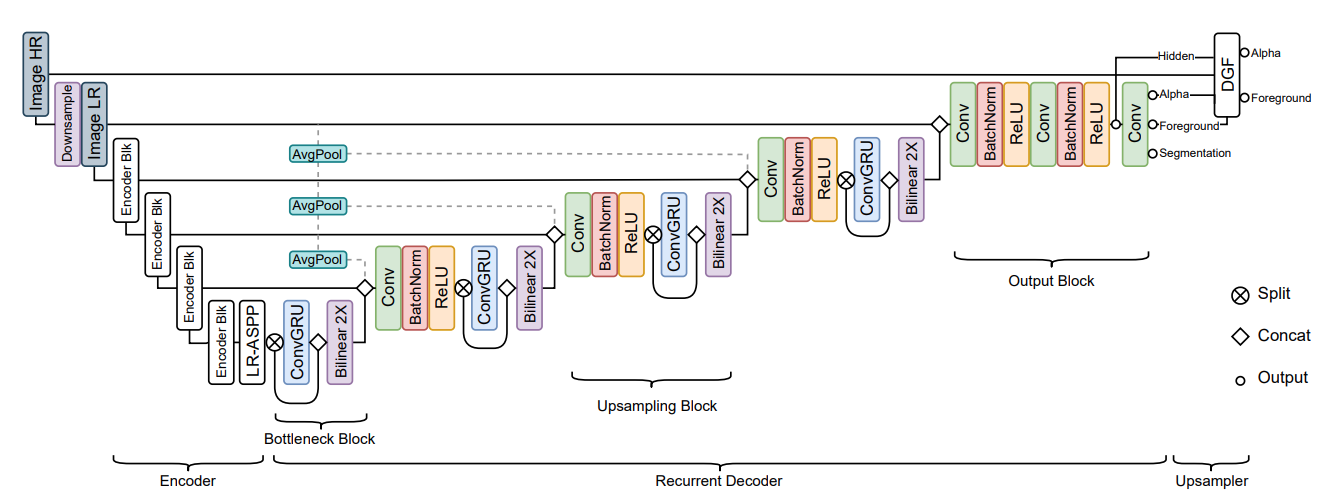
The model has a recurrent nature (ConvGRU) and operates with an input image at 4 different scales (1/2, 1/4, 1/8, 1/16) for which separate hidden states are maintained and are provided as model input along with an actual image.
The repo provides model checkpoints in PyTorch, Tensorflow, ONNX, and CoreML. As for CoreML, there’s also an option to create a custom checkpoint using coremltools, but we’ll use the default one.
Setup
Here’s my environment:
Xcode Version 13.2.1 (13C100)
1.26.21 Apple Swift version 5.5.2
Start Xcode and create a new iOS application:

We’ll use Swift for the language and SwiftUI for the UI part:

We’ll need a physical iOS device to perform debugging since the camera is not accessible in the emulator. Here is a great guide on how to configure it.
When you’re done let’s run the app (don’t forget to select your device from the dropdown menu at the top of the Xcode window). You should see a “Hello World” app:

Code and additional configuration
Now let’s add Camera permissions so our app will be able to access corresponding features: simply add the NSCameraUsageDescription property to Info.plist file:

After you hit enter, the text will be transformed into “Privacy — Camera Usage Description”.
Now, we’re ready to write the actual code!
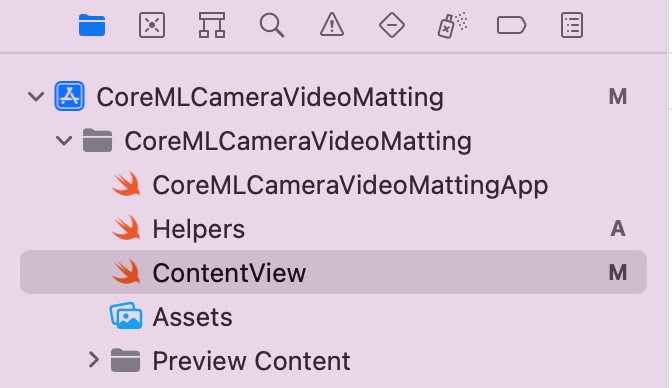
First, let’s add a new file called Helpers.swift. It contains some handy functions and methods that we’ll need later:
import SwiftUI
import Vision

//Background Matting Image Container
//ObservableObject enables usage within SwiftUI views
//@Published makes Swift track changes to the corresponding property and trigger view reloads
class BMSharedImage: ObservableObject {
//    foreground RGB image
    @Published var fgr: UIImage?
//    background RGBA image
    @Published var pha: UIImage?
}

//Some features work differently on MacOS and iOS
//Therefore, we might need to apply some platform-specific settings
func resolveValueForPlatform<T>(iOsValue: T, macOsValue: T) -> T {
    #if os(OSX)
    return macOsValue
    #elseif os(iOS)
        #if targetEnvironment(macCatalyst)
        return macOsValue
        #else
        return iOsValue
        #endif
    #else
    return iOsValue
    #endif
}

//Transform device video buffer into CVPixelBuffer
func getPixelBufferFromSampleBuffer(buffer:CMSampleBuffer) -> CVPixelBuffer? {
    if let pixelBuffer = CMSampleBufferGetImageBuffer(buffer) {
      return pixelBuffer
    }
    return nil
}

extension Image {
//    Prettify the Image for the UI page
    func normalize() -> some View {
        return self.resizable()
            .resizable()
            .aspectRatio(contentMode: .fill)
            .edgesIgnoringSafeArea(.all)
            .frame(maxWidth: UIScreen.main.bounds.width,
                   maxHeight: UIScreen.main.bounds.height)
//        Camera stream is rotated by 90 degrees on iOS device by default
            .rotationEffect(.degrees(resolveValueForPlatform(iOsValue: 90.0, macOsValue: 0.0)))
    }
}

extension CVPixelBuffer {
//    Transform pixel buffer into CGImage
    func toCGImage() -> CGImage {
        let ciImage = CIImage(cvPixelBuffer: self)
        let context = CIContext(options: nil)
        return context.createCGImage(ciImage, from: CGRect(x: 0,y: 0,width: CVPixelBufferGetWidth(self),height: CVPixelBufferGetHeight(self)))!
    }

//    Create BGRA pixel buffer (we need it to transform grayscale pha into BGRA pixel buffer)
    func toBGRApixelBuffer() -> CVPixelBuffer? {
        let width = CVPixelBufferGetWidth(self)
        let height = CVPixelBufferGetHeight(self)
        let frameSize = CGSize(width: width, height: height)

        var pixelBuffer:CVPixelBuffer? = nil
        let status = CVPixelBufferCreate(kCFAllocatorDefault, Int(frameSize.width), Int(frameSize.height), kCVPixelFormatType_32BGRA , nil, &pixelBuffer)
        if status != kCVReturnSuccess {
            return nil
        }

        CVPixelBufferLockBaseAddress(pixelBuffer!, CVPixelBufferLockFlags.init(rawValue: 0))
        let data = CVPixelBufferGetBaseAddress(pixelBuffer!)
        let rgbColorSpace = CGColorSpaceCreateDeviceRGB()
        let bitmapInfo = CGBitmapInfo(rawValue: CGBitmapInfo.byteOrder32Big.rawValue | CGImageAlphaInfo.premultipliedFirst.rawValue)
        let context = CGContext(data: data, width: Int(frameSize.width), height: Int(frameSize.height), bitsPerComponent: 8, bytesPerRow: CVPixelBufferGetBytesPerRow(pixelBuffer!), space: rgbColorSpace, bitmapInfo: bitmapInfo.rawValue)
        context!.draw(self.toCGImage(), in: CGRect(x: 0, y: 0, width: width, height: height))
        CVPixelBufferUnlockBaseAddress(pixelBuffer!, CVPixelBufferLockFlags(rawValue: 0))

        return pixelBuffer
    }
}
It’s worth mentioning that the toBGRApixelBuffer function was taken from this StackOverflow issue. It has a very important role since the RVM model outputs the background image as a grayscale mask (1 channel), while in order to properly display it in Swift we need a BGRA image(4 channels).
Next, replace the contents of the ContentView.swift file with the following code:
import SwiftUI
import AVFoundation
import Vision

struct ContentView: View {
    let colors = [Color.white, Color.green, Color.red, Color.blue, Color.orange, Color.brown, Color.gray, Color.cyan, Color.indigo]
//    Background color of the UI page
    @State var color = Color.white
//    Current image. change in @StateObject property will rerender view
    @StateObject var sharedImage = BMSharedImage()

    var body: some View {
        VStack() {
//            In order to update the image we need propagate it to UI controller that encapsulates camera logic
            CustomCameraRepresentable(sharedImage: sharedImage)

            Group {
//                TODO: we'll add pha (background mask) later
                if let fgr = sharedImage.fgr  {
                    Image(uiImage: fgr).normalize()
                }
            }.overlay(
                Button("Shuffle Color") {
                    color = colors.randomElement()!
                }.padding()
                 .font(.system(size: 20, weight: Font.Weight.bold))
                 .foregroundColor(Color.white)
                 .background(RoundedRectangle(cornerRadius: 8).fill(Color.blue))
                 .buttonStyle(PlainButtonStyle()), alignment: .bottom)
        }.padding(.bottom, 200).background(self.color)
    }
}

struct CustomCameraRepresentable: UIViewControllerRepresentable {
    var sharedImage: BMSharedImage

    func makeUIViewController(context: Context) -> CustomCameraController {
        let controller = CustomCameraController(sharedImage: sharedImage)
        return controller
    }

    func updateUIViewController(_ cameraViewController: CustomCameraController, context: Context) {}
}

class CustomCameraController: UIViewController, AVCaptureVideoDataOutputSampleBufferDelegate {
    let targetFps = Int32(10)
    let videoOutput = AVCaptureVideoDataOutput()
    var sharedImage = BMSharedImage()
    var captureSession = AVCaptureSession()

    init(sharedImage: BMSharedImage) {
//        TODO: We'll add Background Matting model later
        self.sharedImage = sharedImage
        super.init(nibName: nil, bundle: nil)
    }

    required init?(coder: NSCoder) {
        super.init(coder: coder)
    }

    override func viewDidLoad() {
        super.viewDidLoad()
        setup()
    }

//    Get front camera device
    func getDevice() -> AVCaptureDevice {
        return AVCaptureDevice.default(AVCaptureDevice.DeviceType.builtInWideAngleCamera, for: .video, position: .front)!
    }

    func setup() {
        let device = getDevice()
//        Set camera input stream
        let cameraInput = try! AVCaptureDeviceInput(device: device)
        self.captureSession.addInput(cameraInput)

//        Set camera output stream. stream is processed by captureOutput function defined below
        self.videoOutput.videoSettings = [(kCVPixelBufferPixelFormatTypeKey as NSString) : NSNumber(value: kCVPixelFormatType_32BGRA)] as [String : Any]
        self.videoOutput.setSampleBufferDelegate(self, queue: DispatchQueue(label: "my.image.handling.queue"))
        self.captureSession.addOutput(self.videoOutput)

//        1280x720 is the dimentionality of the model's input that we'll use
//        the model doesn't contain any built-in preprocessing related to scaling
//        so let's transform a video stream to a desired size beforehand
        self.captureSession.sessionPreset = AVCaptureSession.Preset.hd1280x720
        self.captureSession.startRunning()
    }

//    Process output video stream
    func captureOutput(_ output: AVCaptureOutput,
                       didOutput sampleBuffer: CMSampleBuffer,
                       from connection: AVCaptureConnection) {
        if let pixelBuffer = getPixelBufferFromSampleBuffer(buffer: sampleBuffer) {
//            TODO: We'll change this logic to a model inference later
            DispatchQueue.main.sync {
                self.sharedImage.fgr = UIImage(cgImage: pixelBuffer.toCGImage())
            }
        }
    }
}

struct ContentView_Previews: PreviewProvider {
    static var previews: some View {
        ContentView()
    }
}
The logic for the camera integration into SwiftUI was taken from this StackOverflow issue.
Please, note that we’ll change the code near TODO labels when we add a Video Matting model.
Also, you can notice that instead of a high-level component like AVCaptureVideoPreviewLayer a simple image is used to display camera output. It might sound very inefficient, however, this is done deliberately in order to keep the app as simple as possible after we apply the Background Matting model to the output. Otherwise, it would be much harder to add custom layers on top of the preview component.
Now, we are ready to run our app! You should see a Camera Access Request first:

Click OK and you will get a camera preview window with a button that allows you to randomly change the background color:

Looks nice already, isn’t it? The next and final step is to add the RVM model so we remove the background from the camera stream.
Adding the RVM model
Now let’s download the pre-trained CoreML model from the Robust Video Matting Github repo. There’re 4 options with different resolutions and quantization approaches. I picked the following checkpoint: rvm_mobilenetv3_1280x720_s0.375_fp16.mlmodel.
Rename the file to a human-friendly name — RVM.mlmodel. Create a New Group via Xcode and name it Models. This will also create a Models directory. Now you can drag and drop the RVM.mlmodel file to the Models directory. This will import the model with all the necessary metadata into the project. Also, useful classes will be generated: RVMInput and RVMOutput that provide a convenient interface for the model.

Now we need to implement the functionality to call the model. Let’s create a new Swift file called RVMPredictor.swift with the following contents:
import CoreML
import Vision
import CoreImage
import UIKit

struct RVMPredictor {
    let model: RVM = {
        do {
            return try RVM(configuration:  MLModelConfiguration())
        } catch {
            print(error)
            fatalError("can't create model")
        }
    }()

    var sharedImage: BMSharedImage
    var r1: MLMultiArray?
    var r2: MLMultiArray?
    var r3: MLMultiArray?
    var r4: MLMultiArray?

    mutating func predict(src: CVPixelBuffer) {
        let modelInput = RVMInput(src: src, r1i: r1, r2i: r2, r3i: r3, r4i: r4)

        let modelOutput = try! model.prediction(input: modelInput)

        r1 = modelOutput.r1o
        r2 = modelOutput.r2o
        r3 = modelOutput.r3o
        r4 = modelOutput.r4o
//        fgr is an RGB foreground image
        let fgrCGIImage = modelOutput.fgr.toCGImage()
//        pha mask is in grayscale! in order to display it properly we need to convert it to RGBA
        let phaCGIImage = modelOutput.pha.toBGRApixelBuffer()!.toCGImage()
//        UI updates have to performed from the main thread
        DispatchQueue.main.sync {
            self.sharedImage.fgr = UIImage(cgImage: fgrCGIImage)
            self.sharedImage.pha = UIImage(cgImage: phaCGIImage)
        }
    }
}
Here we define the model, images container, and 4 variables for hidden states. Then we build input and run the model. After that, we convert a foreground image fgr to CGImage (RGB). pha is a grayscale CVPixelBuffer containing a background mask. In order to display it in our map, we convert it into the BGRA image using a previously defined helper method. Also, we update hidden states and sharedImage variables to reflect the latest model’s output which is propagated to the UI.
The last thing we need to do is to fill our TODO items in the ContentView.swift file:
//1) Replace lines 18-21 with the following:
if let fgr = sharedImage.fgr, let pha = sharedImage.pha {
    Image(uiImage: fgr).normalize().mask(
        Image(uiImage: pha).normalize()
    )
}

//2) Replace lines 50-55 with the following:
var predictor: RVMPredictor?

init(sharedImage: BMSharedImage) {
    self.predictor = RVMPredictor(sharedImage: sharedImage)
    super.init(nibName: nil, bundle: nil)
}

//3) Replace lines 94-97 with the following:
predictor!.predict(src: pixelBuffer)
So 1) replaces a single image with an image masked by a BGRA background. Alpha channel makes pixels corresponding to the background transparent. 2) adds our model’s predictor into the controller. 3) calls the model for each new frame from the camera stream and updates the screen.

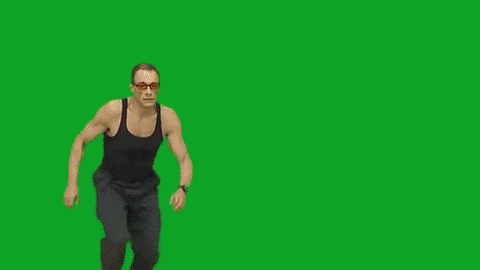
Voila! If you haven’t missed anything, launch the app and you should get a camera screen with removed background, like on the GIF at the beginning of the post.
Mac Catalyst
As I mentioned, before this project I haven’t had any native iOS experience. So I took the most of this opportunity and also explored Mac Catalyst — a recent project created by Apple that allows compiling iOS applications into MacOS desktop apps without any changes in the code. Just check the highlighted option and you’re ready to pick your Mac as your next build target:

Conclusion
CoreML is a great framework and it perfectly fits into the Apple ecosystem. Apart from using trained models for inference starting from iOS 15 it also enables on-device training which along with concepts like differential privacy can tackle the problem of data processing involving client-sensitive data.
I enjoyed working with Apple’s mobile stack. Although my main ML and engineering skills are heavily related to Python and backend tech, my acquaintance with this new domain was quite smooth and productive.
That’s it! I hope this article was useful and inspiring 😉
— Dmitry Voitekh, Senior ML Engineer, Discovery team